Create and configure your first Telzino AI agent from the AI Agents tile in your NetSapiens domain
This guide covers setting up your first AI agent on your NetSapiens base. It assumes you have already claimed your user base and added your domain. If you haven’t, complete Claim NetSapiens Base to Telzino first. The rest of the setup happens inside your NetSapiens domain.
1
Start a new agent
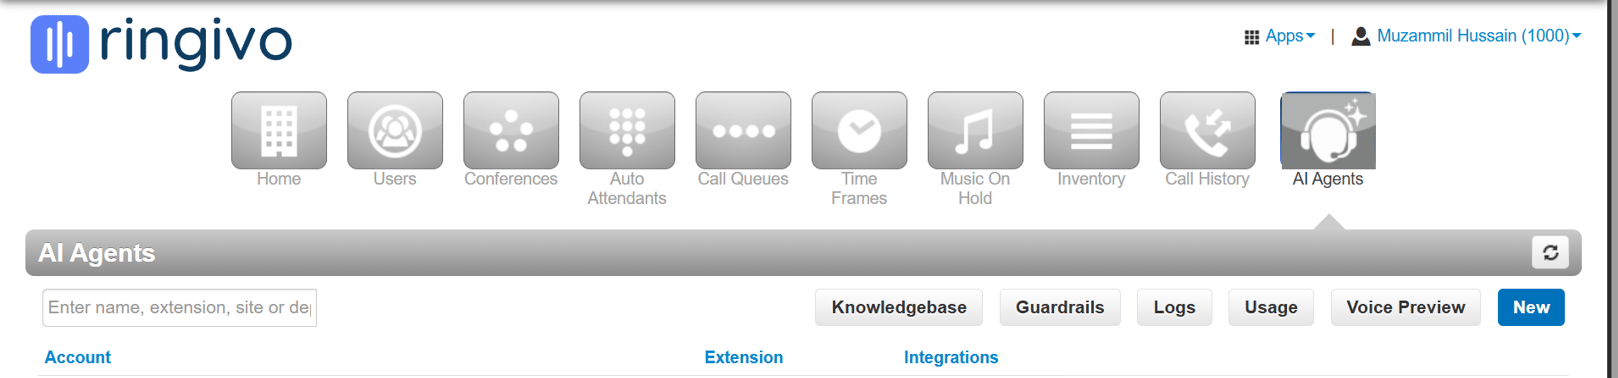
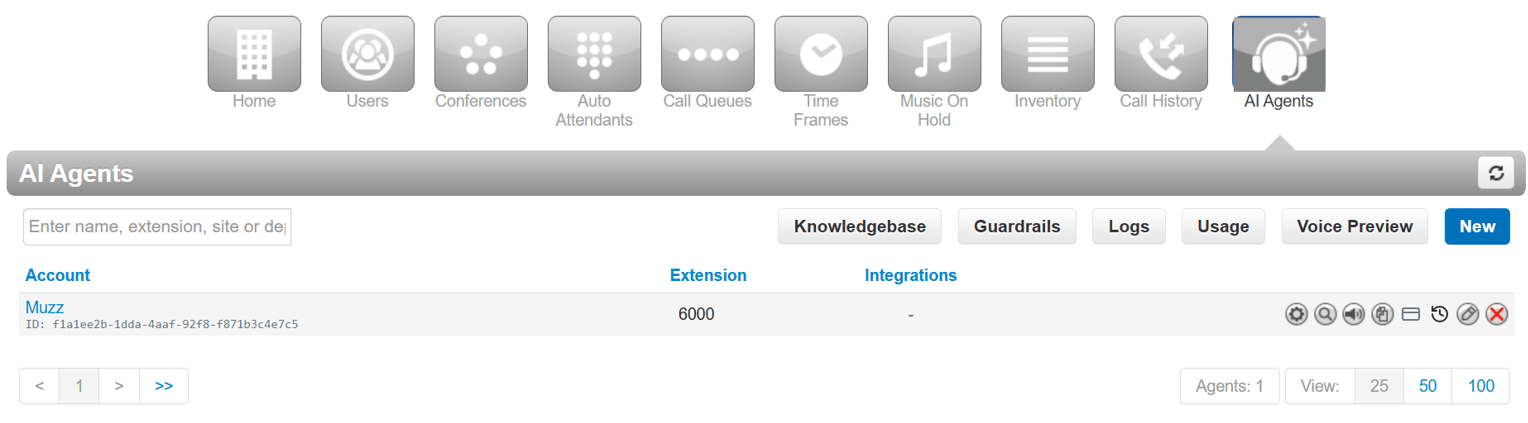
Go to your NetSapiens domain and click the AI Agents tile. On the page that opens, click New to start the agent setup.
The AI Agents page, with the New button.
2
Choose an extension
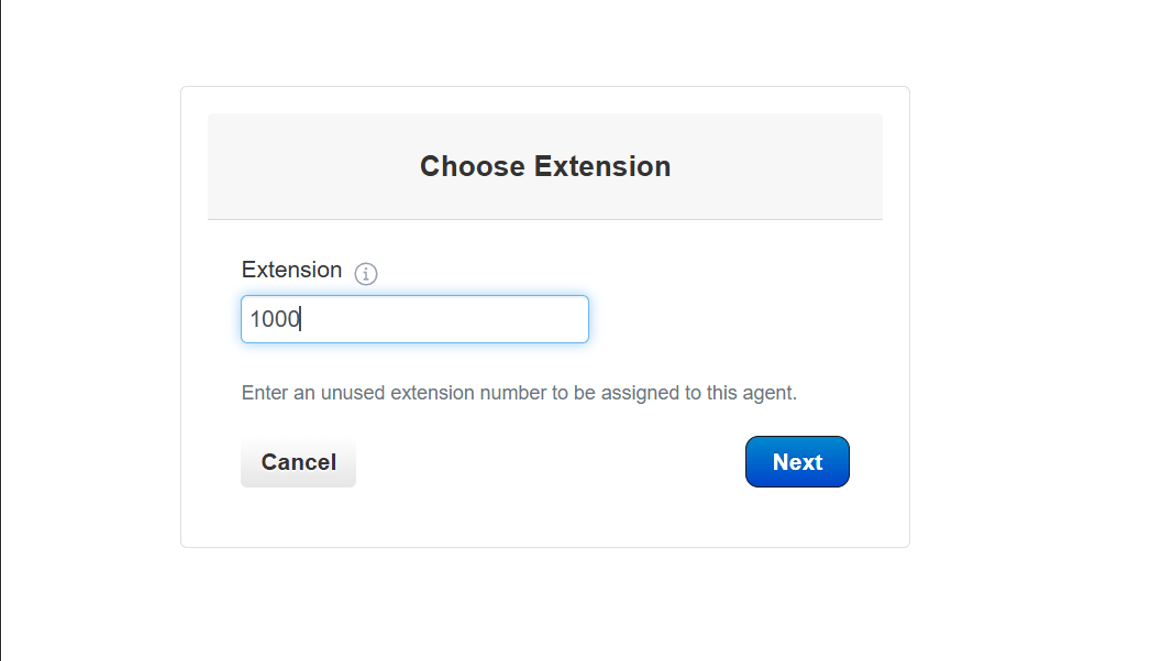
Choose the extension number you want for this agent.
Extension number step.
3
Set the caller ID
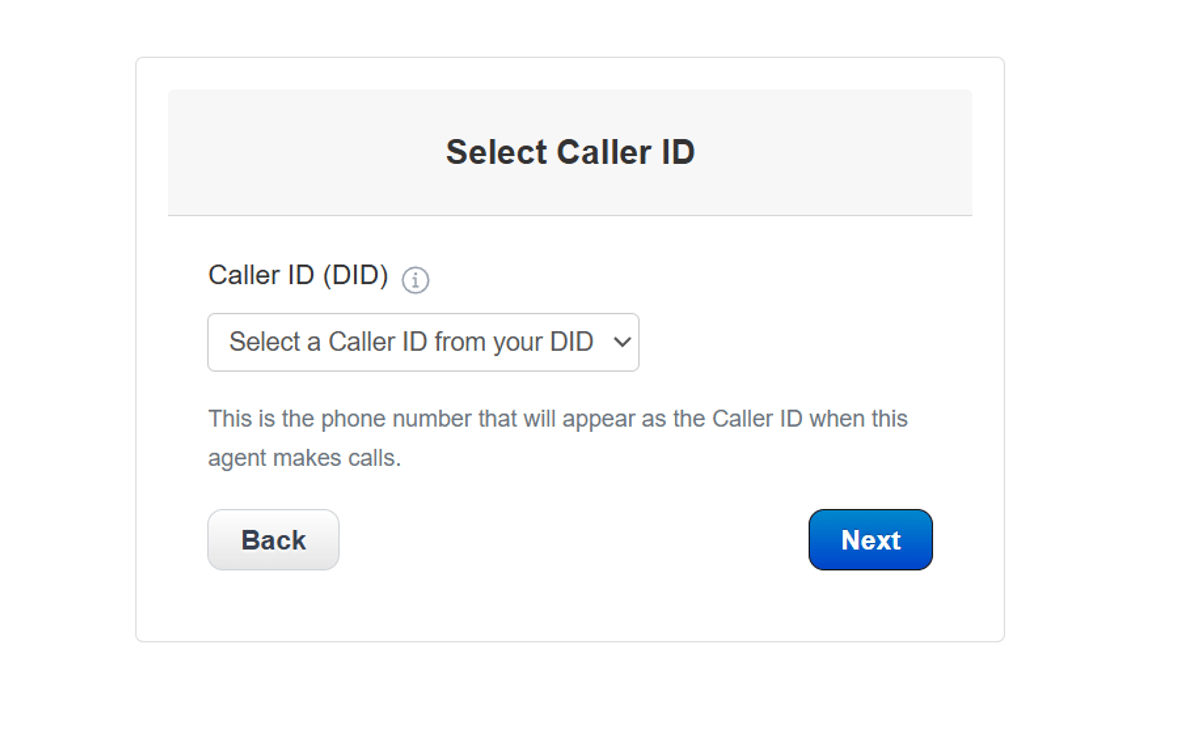
Set the caller ID.
Caller ID step.
4
Name the agent
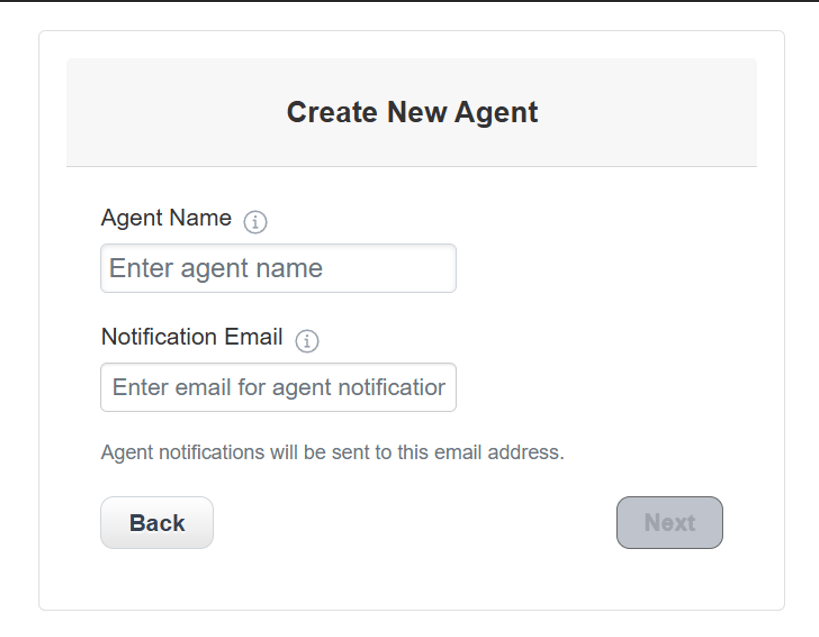
Name the agent and add a notification email.
Agent name and notification email.
5
Pick a template
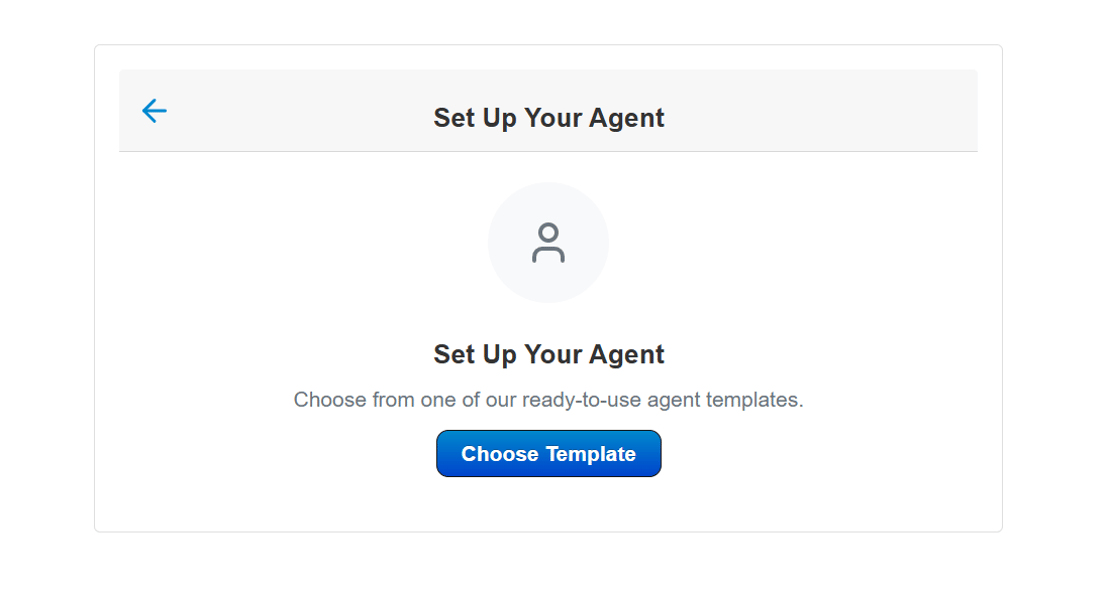
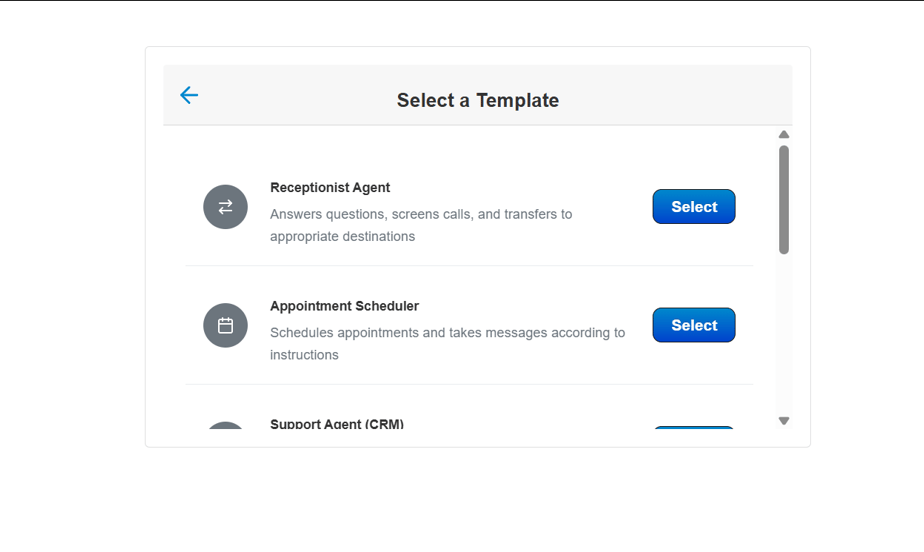
Click Choose Template, then pick an agent from the library.
The Choose Template prompt.
The template library, with a Select button on each option.
6
Add business context
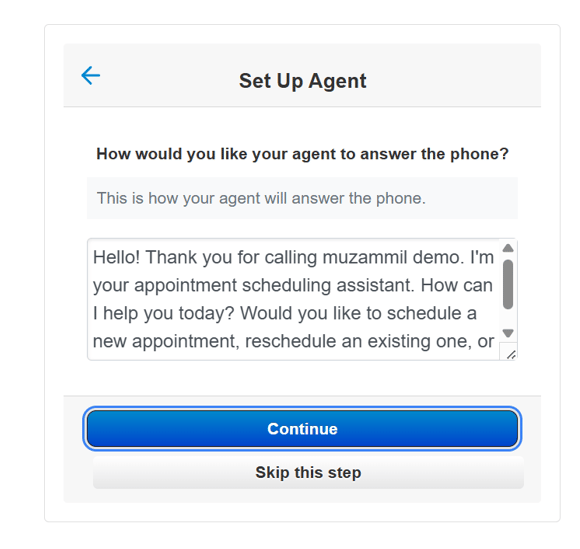
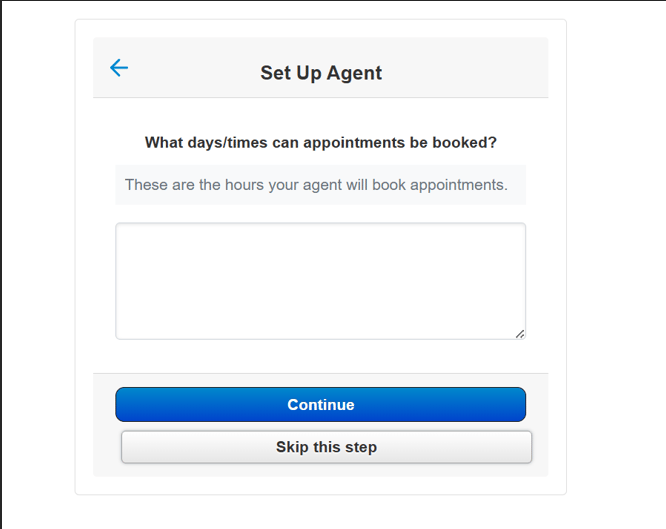
Add some context about your business: how the agent should greet callers, and which days and times appointments can be booked. You can skip either step.
Greeting step.
Booking days and times.
7
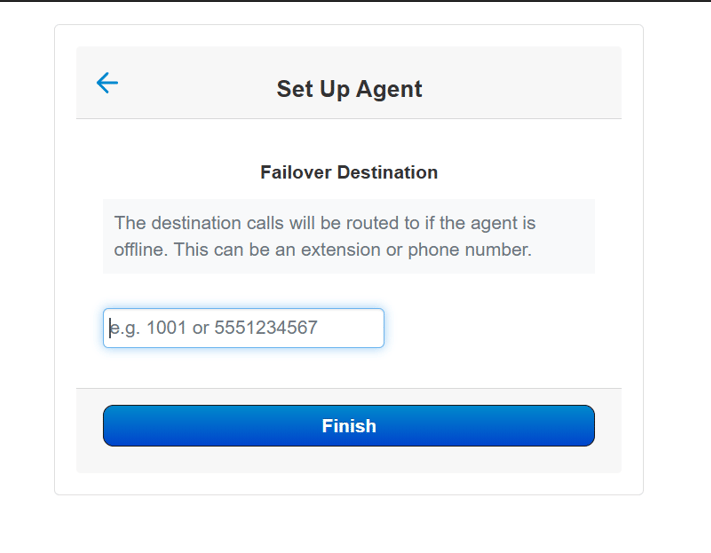
Set the failover destination
Set the failover destination. This is where calls go if the agent is offline. It can be an extension or a phone number. Click Finish.
Failover destination, then Finish.
8
Done
Your agent is now set up and live.
Personalize the agent (optional)
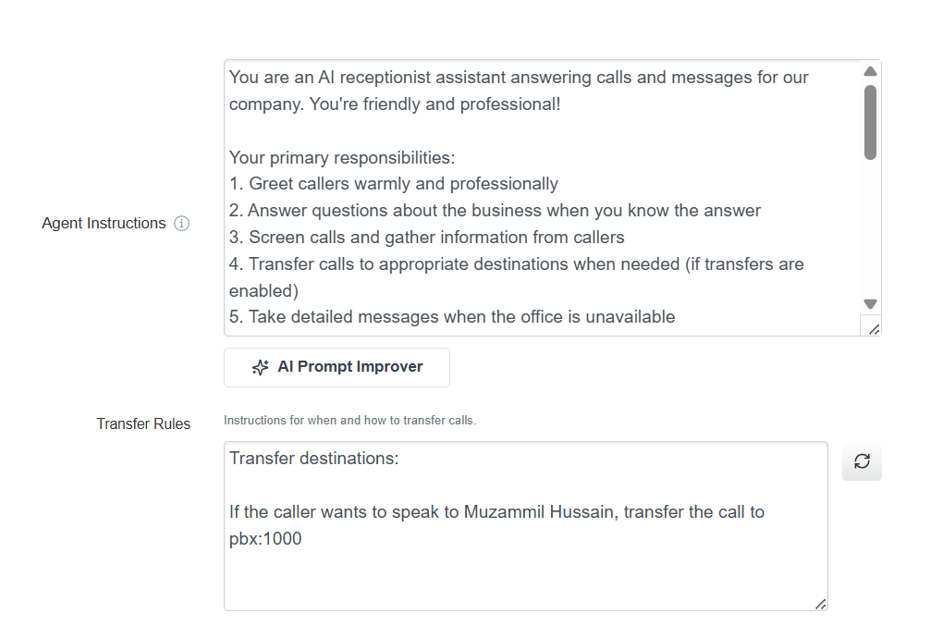
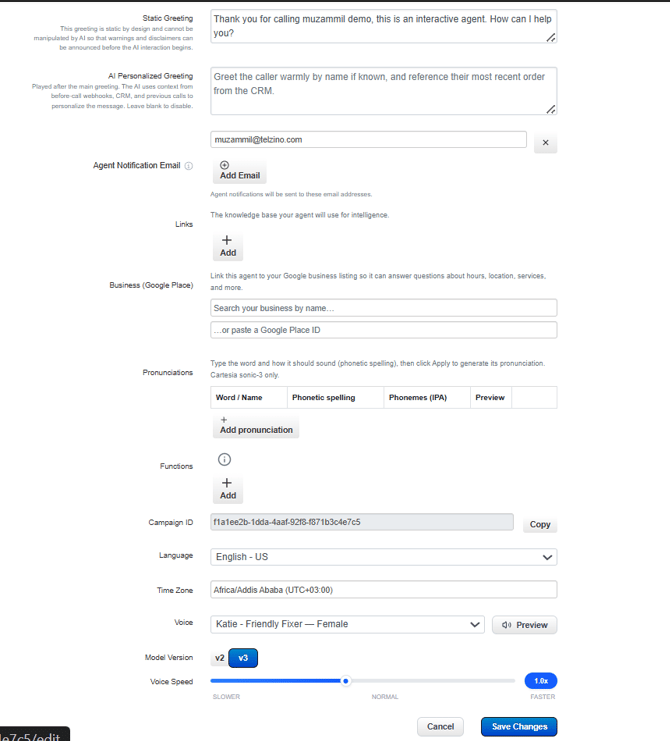
For more tailored responses, give the agent your own instructions and settings.
1
Open your agents
Click the AI Agents tile in your NetSapiens base. The agent you just set up appears on the page.
2
Click the edit icon
Hover over the agent, then hover over the pencil icon. This is the edit button, and it starts the personalization flow.
The edit (pencil) icon on an existing agent.
3
Adjust the settings
This opens the detailed settings, where you can personalize the agent.
Settings tabs.
Agent instructions and transfer rules.
Greetings, notification emails, voice, language, and other settings.
Add a knowledge base (optional)
For full business context, give the agent documents to work from. It refers to them in every conversation.
1
Upload your documents
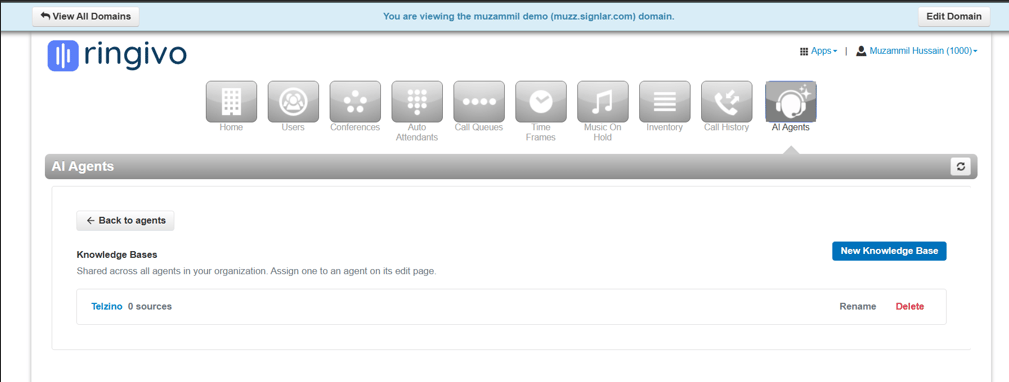
On the AI Agents page, open the Knowledge Base tab and upload the documents you want the agent to use.
Knowledge Bases inside the AI Agents page.
{"docsConfig":{"theme":"mint","$schema":"https://mintlify.com/docs.json","name":"AI Phone Agent Docs","colors":{"primary":"#0075FF","light":"#0075FF","dark":"#0075FF"},"logo":{"light":"https://mintcdn.com/telimatic/yiNgz-d0a-JfVRwO/logo/mainlogo.png?fit=max\u0026auto=format\u0026n=yiNgz-d0a-JfVRwO\u0026q=85\u0026s=a231ffe7491e72d2aa1f0b2e60ba2bfe","dark":"https://mintcdn.com/telimatic/yiNgz-d0a-JfVRwO/logo/mainlogo.png?fit=max\u0026auto=format\u0026n=yiNgz-d0a-JfVRwO\u0026q=85\u0026s=a231ffe7491e72d2aa1f0b2e60ba2bfe","href":"https://telzino.com"},"favicon":"https://mintcdn.com/telimatic/Pjr_MfdVwCp3s3aG/favicon.ico?fit=max\u0026auto=format\u0026n=Pjr_MfdVwCp3s3aG\u0026q=85\u0026s=a7ec57eb85142c4fa0a7496227c435a8","appearance":{"default":"light","strict":true},"navbar":{"links":[{"href":"https://telzino.com/examples","label":"Examples"},{"href":"https://telzino.com/pricing","label":"Pricing"}],"primary":{"type":"button","label":"Login","href":"https://dashboard.telzino.com/auth/login"}},"seo":{"metatags":{"description":"The AI phone agent for small business. Answer calls and texts with an AI phone agent that always works and is never busy.","og:title":"Docs - AI phone agents for SMB","og:description":"The AI phone agent for small business. Answer calls and texts with an AI phone agent that always works and is never busy.","og:image":"https://telzino.com/images/openGraphImage-noBrand.png","og:image:width":"3600","og:image:height":"1881","og:site_name":"Docs - AI phone agents for SMB"},"indexing":"navigable"},"styling":{"latex":true},"navigation":{"pages":[]}},"deployment":{"deploymentMetadataValue":{"subdomain":"telimatic","hasAudioNarration":false,"actualSubdomain":"telimatic","customDomains":["docs.telzino.com"],"gitSource":{"type":"github","owner":"telimatic","repo":"telzino-mintlify-docs","deployBranch":"main","contentDirectory":"","isPrivate":true,"mountPath":"","label":""},"entitlements":{},"buildId":"6af613d1701afd0a5b2ef42c","clientVersion":"0.0.4138","searchFilterCounts":[{"language":"default","tag":"Documentation","count":117},{"language":"default","tag":"API Reference","count":110},{"language":"default","tag":"Agent Functions","count":29},{"language":"default","tag":"Event Webhooks","count":20},{"language":"default","tag":"Agents","count":16},{"language":"default","tag":"Telzino Dashboard","count":13},{"language":"default","tag":"Connect App","count":12},{"language":"default","tag":"Integrations","count":10},{"language":"default","tag":"Agent Examples","count":10},{"language":"default","tag":"NetSapiens Functions","count":9}]},"assistantConfig":{},"basePath":"","hasChatPermissions":false,"hasWebMcpPermissions":false,"toggles":[{"name":"kill-isr","enabled":true,"variant":{"name":"disabled","enabled":false,"feature_enabled":true},"impressionData":false},{"name":"custom-rbac-roles","enabled":true,"variant":{"name":"disabled","enabled":false,"feature_enabled":true},"impressionData":false},{"name":"agent-mintlify-slack","enabled":true,"variant":{"name":"disabled","enabled":false,"feature_enabled":true},"impressionData":false},{"name":"agent-integrations-settings","enabled":true,"variant":{"name":"disabled","enabled":false,"feature_enabled":true},"impressionData":false},{"name":"rbac-expansion","enabled":true,"variant":{"name":"disabled","enabled":false,"feature_enabled":true},"impressionData":false},{"name":"automations-pr-grouping","enabled":true,"variant":{"name":"disabled","enabled":false,"feature_enabled":true},"impressionData":false},{"name":"custom-prefix","enabled":true,"variant":{"name":"disabled","enabled":false,"feature_enabled":true},"impressionData":false},{"name":"analytics-v7","enabled":true,"variant":{"name":"disabled","enabled":false,"feature_enabled":true},"impressionData":false},{"name":"user-flows-analytics","enabled":true,"variant":{"name":"disabled","enabled":false,"feature_enabled":true},"impressionData":false},{"name":"no-publish-flow","enabled":true,"variant":{"name":"disabled","enabled":false,"feature_enabled":true},"impressionData":false},{"name":"workos-onboarding","enabled":true,"variant":{"name":"disabled","enabled":false,"feature_enabled":true},"impressionData":false},{"name":"snapshot-serving-live","enabled":true,"variant":{"name":"disabled","enabled":false,"feature_enabled":true},"impressionData":false},{"name":"stripTemperatureMiddleware","enabled":true,"variant":{"name":"disabled","enabled":false,"feature_enabled":true},"impressionData":false},{"name":"support-platform-pylon-zendesk","enabled":true,"variant":{"name":"disabled","enabled":false,"feature_enabled":true},"impressionData":false},{"name":"snapshot-serving","enabled":true,"variant":{"name":"disabled","enabled":false,"feature_enabled":true},"impressionData":false},{"name":"instant-rollback","enabled":true,"variant":{"name":"disabled","enabled":false,"feature_enabled":true},"impressionData":false},{"name":"granular-notifications-server","enabled":true,"variant":{"name":"disabled","enabled":false,"feature_enabled":true},"impressionData":false},{"name":"granular-notifications","enabled":true,"variant":{"name":"disabled","enabled":false,"feature_enabled":true},"impressionData":false},{"name":"automations-fable","enabled":true,"variant":{"name":"disabled","enabled":false,"feature_enabled":true},"impressionData":false},{"name":"fixed-ai-action-pricing","enabled":true,"variant":{"name":"disabled","enabled":false,"feature_enabled":true},"impressionData":false},{"name":"automation-resolve-merge-conflict","enabled":true,"variant":{"name":"disabled","enabled":false,"feature_enabled":true},"impressionData":false},{"name":"scoped-publishing","enabled":true,"variant":{"name":"disabled","enabled":false,"feature_enabled":true},"impressionData":false},{"name":"mintql","enabled":true,"variant":{"name":"disabled","enabled":false,"feature_enabled":true},"impressionData":false},{"name":"page-level-analytics","enabled":true,"variant":{"name":"disabled","enabled":false,"feature_enabled":true},"impressionData":false},{"name":"editor-version-history-v2","enabled":true,"variant":{"name":"disabled","enabled":false,"feature_enabled":true},"impressionData":false},{"name":"billing-page-v2","enabled":true,"variant":{"name":"disabled","enabled":false,"feature_enabled":true},"impressionData":false},{"name":"full-page-search","enabled":true,"variant":{"name":"disabled","enabled":false,"feature_enabled":true},"impressionData":false},{"name":"workspace-projects","enabled":true,"variant":{"name":"disabled","enabled":false,"feature_enabled":true},"impressionData":false},{"name":"assistant-v5","enabled":true,"variant":{"name":"disabled","enabled":false,"feature_enabled":true},"impressionData":false},{"name":"fork-pr-previews","enabled":true,"variant":{"name":"disabled","enabled":false,"feature_enabled":true},"impressionData":false},{"name":"revalidation-jwt","enabled":true,"variant":{"name":"disabled","enabled":false,"feature_enabled":true},"impressionData":false},{"name":"workos-sso-scim","enabled":true,"variant":{"name":"disabled","enabled":false,"feature_enabled":true},"impressionData":false},{"name":"hobby-abuse-scan","enabled":true,"variant":{"name":"disabled","enabled":false,"feature_enabled":true},"impressionData":false},{"name":"dashboard-inbox","enabled":true,"variant":{"name":"disabled","enabled":false,"feature_enabled":true},"impressionData":false},{"name":"workos-signup","enabled":true,"variant":{"name":"disabled","enabled":false,"feature_enabled":true},"impressionData":false},{"name":"turbopuffer-dual-write","enabled":true,"variant":{"name":"disabled","enabled":false,"feature_enabled":true},"impressionData":false},{"name":"workos-enabled","enabled":true,"variant":{"name":"disabled","enabled":false,"feature_enabled":true},"impressionData":false},{"name":"approve-review-flow","enabled":true,"variant":{"name":"disabled","enabled":false,"feature_enabled":true},"impressionData":false},{"name":"editor-metadata","enabled":true,"variant":{"name":"disabled","enabled":false,"feature_enabled":true},"impressionData":false},{"name":"sso-setup-deadline-banner","enabled":true,"variant":{"name":"disabled","enabled":false,"feature_enabled":true},"impressionData":false},{"name":"turbopuffer-serve","enabled":true,"variant":{"name":"disabled","enabled":false,"feature_enabled":true},"impressionData":false},{"name":"live-agents","enabled":true,"variant":{"name":"disabled","enabled":false,"feature_enabled":true},"impressionData":false},{"name":"llms-txt-v2","enabled":true,"variant":{"name":"disabled","enabled":false,"feature_enabled":true},"impressionData":false}],"googleFontsInlined":false},"customCss":[{"filePath":"style.css","content":"html[data-domain] img[alt=\"light logo\"],html[data-domain] img[alt=\"dark logo\"]{visibility:hidden}#sidebar a,#navigation-items a,.sidebar-title{text-decoration:none}"}],"page":{"pagePath":"setup-guides/netsapiens-first-agent","slug":"/setup-guides/netsapiens-first-agent","pageMetadata":{"title":"Set Up Your First AI Agent on NetSapiens","sidebarTitle":"Set Up Your First AI Agent on NetSapiens","description":"Create and configure your first Telzino AI agent from the AI Agents tile in your NetSapiens domain","href":"/setup-guides/netsapiens-first-agent"},"description":{"compiledSource":"\"use strict\";\nconst {jsx: _jsx} = arguments[0];\nconst {useMDXComponents: _provideComponents} = arguments[0];\nfunction _createMdxContent(props) {\n const _components = {\n p: \"p\",\n ..._provideComponents(),\n ...props.components\n };\n return _jsx(_components.p, {\n children: \"Create and configure your first Telzino AI agent from the AI Agents tile in your NetSapiens domain\"\n });\n}\nfunction MDXContent(props = {}) {\n const {wrapper: MDXLayout} = {\n ..._provideComponents(),\n ...props.components\n };\n return MDXLayout ? _jsx(MDXLayout, {\n ...props,\n children: _jsx(_createMdxContent, {\n ...props\n })\n }) : _createMdxContent(props);\n}\nreturn {\n default: MDXContent\n};\n","frontmatter":{},"scope":{}},"pageType":"default","mdx":{"mdxSource":{"compiledSource":"\"use strict\";const{Fragment:_Fragment,jsx:_jsx,jsxs:_jsxs}=arguments[0];const{useMDXComponents:_provideComponents}=arguments[0];function _createMdxContent(props){const _components={a:`a`,p:`p`,strong:`strong`,..._provideComponents(),...props.components},{Frame,Heading,OptimizedImage,Step,Steps}=_components;if(!Frame)_missingMdxReference(`Frame`,true);if(!Heading)_missingMdxReference(`Heading`,true);if(!OptimizedImage)_missingMdxReference(`OptimizedImage`,true);if(!Step)_missingMdxReference(`Step`,true);if(!Steps)_missingMdxReference(`Steps`,true);return _jsxs(_Fragment,{children:[_jsxs(_components.p,{children:[`This guide covers setting up your first AI agent on your NetSapiens base. It assumes you have already claimed your user base and added your domain. If you haven’t, complete `,_jsx(_components.a,{href:`/setup-guides/connect-netsapiens-base`,children:`Claim NetSapiens Base to Telzino`}),` first. The rest of the setup happens inside your NetSapiens domain.`]}),`\n`,_jsxs(Steps,{children:[_jsxs(Step,{title:`Start a new agent`,children:[_jsxs(_components.p,{children:[`Go to your NetSapiens domain and click the `,_jsx(_components.strong,{children:`AI Agents`}),` tile. On the page that opens, click `,_jsx(_components.strong,{children:`New`}),` to start the agent setup.`]}),_jsx(Frame,{caption:`The AI Agents page, with the New button.`,children:_jsx(OptimizedImage,{src:`https://mintcdn.com/telimatic/PFlUzUBlM0j5aYl9/images/Screenshot-2026-10-01-212545.png?fit=max\u0026auto=format\u0026n=PFlUzUBlM0j5aYl9\u0026q=85\u0026s=b9a0bb1ac62d0560b7de48409e0d334d`,alt:`Screenshot 2026 10 01 212545`,\"data-og-width\":`1618`,width:`1618`,\"data-og-height\":`378`,height:`378`,\"data-path\":`images/Screenshot-2026-10-01-212545.png`,\"data-optimize\":`true`,\"data-opv\":`3`,srcset:`https://mintcdn.com/telimatic/PFlUzUBlM0j5aYl9/images/Screenshot-2026-10-01-212545.png?w=280\u0026fit=max\u0026auto=format\u0026n=PFlUzUBlM0j5aYl9\u0026q=85\u0026s=3526b4a6c318ad8337c73239d165545a 280w, https://mintcdn.com/telimatic/PFlUzUBlM0j5aYl9/images/Screenshot-2026-10-01-212545.png?w=560\u0026fit=max\u0026auto=format\u0026n=PFlUzUBlM0j5aYl9\u0026q=85\u0026s=7db8734ba433651b90f82647a0f3dcab 560w, https://mintcdn.com/telimatic/PFlUzUBlM0j5aYl9/images/Screenshot-2026-10-01-212545.png?w=840\u0026fit=max\u0026auto=format\u0026n=PFlUzUBlM0j5aYl9\u0026q=85\u0026s=a0b859f959fa9ed85ad2a4dd5b8c8b5f 840w, https://mintcdn.com/telimatic/PFlUzUBlM0j5aYl9/images/Screenshot-2026-10-01-212545.png?w=1100\u0026fit=max\u0026auto=format\u0026n=PFlUzUBlM0j5aYl9\u0026q=85\u0026s=31e764643941ef3cdf60f4b5afef1c92 1100w, https://mintcdn.com/telimatic/PFlUzUBlM0j5aYl9/images/Screenshot-2026-10-01-212545.png?w=1650\u0026fit=max\u0026auto=format\u0026n=PFlUzUBlM0j5aYl9\u0026q=85\u0026s=dd6bfb3728fc4ecd309ee67685224a5a 1650w, https://mintcdn.com/telimatic/PFlUzUBlM0j5aYl9/images/Screenshot-2026-10-01-212545.png?w=2500\u0026fit=max\u0026auto=format\u0026n=PFlUzUBlM0j5aYl9\u0026q=85\u0026s=520ede2c4099fa09e7b4f65956d6c3c2 2500w`})})]}),_jsxs(Step,{title:`Choose an extension`,children:[_jsx(_components.p,{children:`Choose the extension number you want for this agent.`}),_jsx(Frame,{caption:`Extension number step.`,children:_jsx(OptimizedImage,{src:`https://mintcdn.com/telimatic/PFlUzUBlM0j5aYl9/images/Screenshot-2026-10-01-212624.png?fit=max\u0026auto=format\u0026n=PFlUzUBlM0j5aYl9\u0026q=85\u0026s=15092944e35a14aa5fb8be9f62129546`,alt:`Screenshot 2026 10 01 212624`,\"data-og-width\":`1170`,width:`1170`,\"data-og-height\":`661`,height:`661`,\"data-path\":`images/Screenshot-2026-10-01-212624.png`,\"data-optimize\":`true`,\"data-opv\":`3`,srcset:`https://mintcdn.com/telimatic/PFlUzUBlM0j5aYl9/images/Screenshot-2026-10-01-212624.png?w=280\u0026fit=max\u0026auto=format\u0026n=PFlUzUBlM0j5aYl9\u0026q=85\u0026s=be1617b4e0bac69dfc20ee032eff8e53 280w, https://mintcdn.com/telimatic/PFlUzUBlM0j5aYl9/images/Screenshot-2026-10-01-212624.png?w=560\u0026fit=max\u0026auto=format\u0026n=PFlUzUBlM0j5aYl9\u0026q=85\u0026s=e0f4ed0b94c8d5a3a8a0ca6c29b27ae5 560w, https://mintcdn.com/telimatic/PFlUzUBlM0j5aYl9/images/Screenshot-2026-10-01-212624.png?w=840\u0026fit=max\u0026auto=format\u0026n=PFlUzUBlM0j5aYl9\u0026q=85\u0026s=c6c667cc615f0aefe50f39c90f84ceaa 840w, https://mintcdn.com/telimatic/PFlUzUBlM0j5aYl9/images/Screenshot-2026-10-01-212624.png?w=1100\u0026fit=max\u0026auto=format\u0026n=PFlUzUBlM0j5aYl9\u0026q=85\u0026s=934e8995728849c4c090de8a6cf43556 1100w, https://mintcdn.com/telimatic/PFlUzUBlM0j5aYl9/images/Screenshot-2026-10-01-212624.png?w=1650\u0026fit=max\u0026auto=format\u0026n=PFlUzUBlM0j5aYl9\u0026q=85\u0026s=50d708c6067772035aa13a54e8de09f2 1650w, https://mintcdn.com/telimatic/PFlUzUBlM0j5aYl9/images/Screenshot-2026-10-01-212624.png?w=2500\u0026fit=max\u0026auto=format\u0026n=PFlUzUBlM0j5aYl9\u0026q=85\u0026s=4ae964d599cb119f5eb36e2997bf58b2 2500w`})})]}),_jsxs(Step,{title:`Set the caller ID`,children:[_jsx(_components.p,{children:`Set the caller ID.`}),_jsx(Frame,{caption:`Caller ID step.`,children:_jsx(OptimizedImage,{src:`https://mintcdn.com/telimatic/PFlUzUBlM0j5aYl9/images/Screenshot-2026-10-01-212651.png?fit=max\u0026auto=format\u0026n=PFlUzUBlM0j5aYl9\u0026q=85\u0026s=bb8031cacdc6192f8a49372fa982b4ab`,alt:`Screenshot 2026 10 01 212651`,\"data-og-width\":`1197`,width:`1197`,\"data-og-height\":`754`,height:`754`,\"data-path\":`images/Screenshot-2026-10-01-212651.png`,\"data-optimize\":`true`,\"data-opv\":`3`,srcset:`https://mintcdn.com/telimatic/PFlUzUBlM0j5aYl9/images/Screenshot-2026-10-01-212651.png?w=280\u0026fit=max\u0026auto=format\u0026n=PFlUzUBlM0j5aYl9\u0026q=85\u0026s=271be71cc63813abe527bd14ce1d4434 280w, https://mintcdn.com/telimatic/PFlUzUBlM0j5aYl9/images/Screenshot-2026-10-01-212651.png?w=560\u0026fit=max\u0026auto=format\u0026n=PFlUzUBlM0j5aYl9\u0026q=85\u0026s=b0de6e40fdca46727eadecd644fdaf8e 560w, https://mintcdn.com/telimatic/PFlUzUBlM0j5aYl9/images/Screenshot-2026-10-01-212651.png?w=840\u0026fit=max\u0026auto=format\u0026n=PFlUzUBlM0j5aYl9\u0026q=85\u0026s=addfd156d4b9a0caf240a419863edab0 840w, https://mintcdn.com/telimatic/PFlUzUBlM0j5aYl9/images/Screenshot-2026-10-01-212651.png?w=1100\u0026fit=max\u0026auto=format\u0026n=PFlUzUBlM0j5aYl9\u0026q=85\u0026s=499d146f993031db66330169cfa3b981 1100w, https://mintcdn.com/telimatic/PFlUzUBlM0j5aYl9/images/Screenshot-2026-10-01-212651.png?w=1650\u0026fit=max\u0026auto=format\u0026n=PFlUzUBlM0j5aYl9\u0026q=85\u0026s=f84f3b9d94f1bd65413108d844c11248 1650w, https://mintcdn.com/telimatic/PFlUzUBlM0j5aYl9/images/Screenshot-2026-10-01-212651.png?w=2500\u0026fit=max\u0026auto=format\u0026n=PFlUzUBlM0j5aYl9\u0026q=85\u0026s=63960dad0573706e7cc736c25d34343d 2500w`})})]}),_jsxs(Step,{title:`Name the agent`,children:[_jsx(_components.p,{children:`Name the agent and add a notification email.`}),_jsx(Frame,{caption:`Agent name and notification email.`,children:_jsx(OptimizedImage,{src:`https://mintcdn.com/telimatic/PFlUzUBlM0j5aYl9/images/Screenshot-2026-10-01-212715.png?fit=max\u0026auto=format\u0026n=PFlUzUBlM0j5aYl9\u0026q=85\u0026s=fd4207dc21ac3a0a17ec4df08b8711c3`,alt:`Screenshot 2026 10 01 212715`,\"data-og-width\":`819`,width:`819`,\"data-og-height\":`637`,height:`637`,\"data-path\":`images/Screenshot-2026-10-01-212715.png`,\"data-optimize\":`true`,\"data-opv\":`3`,srcset:`https://mintcdn.com/telimatic/PFlUzUBlM0j5aYl9/images/Screenshot-2026-10-01-212715.png?w=280\u0026fit=max\u0026auto=format\u0026n=PFlUzUBlM0j5aYl9\u0026q=85\u0026s=a238fc885c50384283160adfc97b4df7 280w, https://mintcdn.com/telimatic/PFlUzUBlM0j5aYl9/images/Screenshot-2026-10-01-212715.png?w=560\u0026fit=max\u0026auto=format\u0026n=PFlUzUBlM0j5aYl9\u0026q=85\u0026s=2e0f9f076a7a9c2852625c2599146149 560w, https://mintcdn.com/telimatic/PFlUzUBlM0j5aYl9/images/Screenshot-2026-10-01-212715.png?w=840\u0026fit=max\u0026auto=format\u0026n=PFlUzUBlM0j5aYl9\u0026q=85\u0026s=16853d94128b5054cbb5c89394d45cb6 840w, https://mintcdn.com/telimatic/PFlUzUBlM0j5aYl9/images/Screenshot-2026-10-01-212715.png?w=1100\u0026fit=max\u0026auto=format\u0026n=PFlUzUBlM0j5aYl9\u0026q=85\u0026s=e7c4891270bac3913cad82293ffafa47 1100w, https://mintcdn.com/telimatic/PFlUzUBlM0j5aYl9/images/Screenshot-2026-10-01-212715.png?w=1650\u0026fit=max\u0026auto=format\u0026n=PFlUzUBlM0j5aYl9\u0026q=85\u0026s=046030012927d1250e8f06f0637949f4 1650w, https://mintcdn.com/telimatic/PFlUzUBlM0j5aYl9/images/Screenshot-2026-10-01-212715.png?w=2500\u0026fit=max\u0026auto=format\u0026n=PFlUzUBlM0j5aYl9\u0026q=85\u0026s=0b29bdacf1e1b0096dbd57e96a05eed9 2500w`})})]}),_jsxs(Step,{title:`Pick a template`,children:[_jsxs(_components.p,{children:[`Click `,_jsx(_components.strong,{children:`Choose Template`}),`, then pick an agent from the library.`]}),_jsx(Frame,{caption:`The Choose Template prompt.`,children:_jsx(OptimizedImage,{src:`https://mintcdn.com/telimatic/PFlUzUBlM0j5aYl9/images/Screenshot-2026-10-01-212741.png?fit=max\u0026auto=format\u0026n=PFlUzUBlM0j5aYl9\u0026q=85\u0026s=54a9178103c004f38b63648bf96990a8`,alt:`Screenshot 2026 10 01 212741`,\"data-og-width\":`1107`,width:`1107`,\"data-og-height\":`604`,height:`604`,\"data-path\":`images/Screenshot-2026-10-01-212741.png`,\"data-optimize\":`true`,\"data-opv\":`3`,srcset:`https://mintcdn.com/telimatic/PFlUzUBlM0j5aYl9/images/Screenshot-2026-10-01-212741.png?w=280\u0026fit=max\u0026auto=format\u0026n=PFlUzUBlM0j5aYl9\u0026q=85\u0026s=f244dc1b26c4ef50715769231d1af1e4 280w, https://mintcdn.com/telimatic/PFlUzUBlM0j5aYl9/images/Screenshot-2026-10-01-212741.png?w=560\u0026fit=max\u0026auto=format\u0026n=PFlUzUBlM0j5aYl9\u0026q=85\u0026s=9b7b3eec6ea242c0224e1588e286ebe5 560w, https://mintcdn.com/telimatic/PFlUzUBlM0j5aYl9/images/Screenshot-2026-10-01-212741.png?w=840\u0026fit=max\u0026auto=format\u0026n=PFlUzUBlM0j5aYl9\u0026q=85\u0026s=00ffeded4cf4d6aeaeb52fae8df526f0 840w, https://mintcdn.com/telimatic/PFlUzUBlM0j5aYl9/images/Screenshot-2026-10-01-212741.png?w=1100\u0026fit=max\u0026auto=format\u0026n=PFlUzUBlM0j5aYl9\u0026q=85\u0026s=2ff26430cf42583accf5b0727d784427 1100w, https://mintcdn.com/telimatic/PFlUzUBlM0j5aYl9/images/Screenshot-2026-10-01-212741.png?w=1650\u0026fit=max\u0026auto=format\u0026n=PFlUzUBlM0j5aYl9\u0026q=85\u0026s=ea56fe215dc55fd12117841808770f21 1650w, https://mintcdn.com/telimatic/PFlUzUBlM0j5aYl9/images/Screenshot-2026-10-01-212741.png?w=2500\u0026fit=max\u0026auto=format\u0026n=PFlUzUBlM0j5aYl9\u0026q=85\u0026s=24c611f1e537a4225657dbd6371bde8d 2500w`})}),_jsx(Frame,{caption:`The template library, with a Select button on each option.`,children:_jsx(OptimizedImage,{src:`https://mintcdn.com/telimatic/PFlUzUBlM0j5aYl9/images/Screenshot-2026-10-01-212815.png?fit=max\u0026auto=format\u0026n=PFlUzUBlM0j5aYl9\u0026q=85\u0026s=e5f2b386c27d0530fad59564e82d2fac`,alt:`Screenshot 2026 10 01 212815`,\"data-og-width\":`924`,width:`924`,\"data-og-height\":`552`,height:`552`,\"data-path\":`images/Screenshot-2026-10-01-212815.png`,\"data-optimize\":`true`,\"data-opv\":`3`,srcset:`https://mintcdn.com/telimatic/PFlUzUBlM0j5aYl9/images/Screenshot-2026-10-01-212815.png?w=280\u0026fit=max\u0026auto=format\u0026n=PFlUzUBlM0j5aYl9\u0026q=85\u0026s=06d49b0810826f7afa96c0c272310187 280w, https://mintcdn.com/telimatic/PFlUzUBlM0j5aYl9/images/Screenshot-2026-10-01-212815.png?w=560\u0026fit=max\u0026auto=format\u0026n=PFlUzUBlM0j5aYl9\u0026q=85\u0026s=4ad8ece68099eada05ff25d1563f2552 560w, https://mintcdn.com/telimatic/PFlUzUBlM0j5aYl9/images/Screenshot-2026-10-01-212815.png?w=840\u0026fit=max\u0026auto=format\u0026n=PFlUzUBlM0j5aYl9\u0026q=85\u0026s=d228c3fa7cfe5f415b275897866cfad6 840w, https://mintcdn.com/telimatic/PFlUzUBlM0j5aYl9/images/Screenshot-2026-10-01-212815.png?w=1100\u0026fit=max\u0026auto=format\u0026n=PFlUzUBlM0j5aYl9\u0026q=85\u0026s=77ac7435c3a4f53bd45469057ad25d80 1100w, https://mintcdn.com/telimatic/PFlUzUBlM0j5aYl9/images/Screenshot-2026-10-01-212815.png?w=1650\u0026fit=max\u0026auto=format\u0026n=PFlUzUBlM0j5aYl9\u0026q=85\u0026s=c7114f02cac16efa6a01bc0caf8bea9a 1650w, https://mintcdn.com/telimatic/PFlUzUBlM0j5aYl9/images/Screenshot-2026-10-01-212815.png?w=2500\u0026fit=max\u0026auto=format\u0026n=PFlUzUBlM0j5aYl9\u0026q=85\u0026s=f0aca7173ea4f3db93fe968b50bb7845 2500w`})})]}),_jsxs(Step,{title:`Add business context`,children:[_jsx(_components.p,{children:`Add some context about your business: how the agent should greet callers, and which days and times appointments can be booked. You can skip either step.`}),_jsx(Frame,{caption:`Greeting step.`,children:_jsx(OptimizedImage,{src:`https://mintcdn.com/telimatic/PFlUzUBlM0j5aYl9/images/Screenshot-2026-10-01-212842.png?fit=max\u0026auto=format\u0026n=PFlUzUBlM0j5aYl9\u0026q=85\u0026s=abf716653d3dee81b54190eaee41c589`,alt:`Screenshot 2026 10 01 212842`,\"data-og-width\":`580`,width:`580`,\"data-og-height\":`549`,height:`549`,\"data-path\":`images/Screenshot-2026-10-01-212842.png`,\"data-optimize\":`true`,\"data-opv\":`3`,srcset:`https://mintcdn.com/telimatic/PFlUzUBlM0j5aYl9/images/Screenshot-2026-10-01-212842.png?w=280\u0026fit=max\u0026auto=format\u0026n=PFlUzUBlM0j5aYl9\u0026q=85\u0026s=25349ca70c36f1b4ea56b4fa42e720c1 280w, https://mintcdn.com/telimatic/PFlUzUBlM0j5aYl9/images/Screenshot-2026-10-01-212842.png?w=560\u0026fit=max\u0026auto=format\u0026n=PFlUzUBlM0j5aYl9\u0026q=85\u0026s=c88ce09bac17faf27f0c1b00eb4b2975 560w, https://mintcdn.com/telimatic/PFlUzUBlM0j5aYl9/images/Screenshot-2026-10-01-212842.png?w=840\u0026fit=max\u0026auto=format\u0026n=PFlUzUBlM0j5aYl9\u0026q=85\u0026s=695a5fde94598e34e6bb4ae383ffbb2e 840w, https://mintcdn.com/telimatic/PFlUzUBlM0j5aYl9/images/Screenshot-2026-10-01-212842.png?w=1100\u0026fit=max\u0026auto=format\u0026n=PFlUzUBlM0j5aYl9\u0026q=85\u0026s=dd4ac105dd32de1a8b91b368fd246a4c 1100w, https://mintcdn.com/telimatic/PFlUzUBlM0j5aYl9/images/Screenshot-2026-10-01-212842.png?w=1650\u0026fit=max\u0026auto=format\u0026n=PFlUzUBlM0j5aYl9\u0026q=85\u0026s=be289a1a9f0ba7aa55ba40672700477e 1650w, https://mintcdn.com/telimatic/PFlUzUBlM0j5aYl9/images/Screenshot-2026-10-01-212842.png?w=2500\u0026fit=max\u0026auto=format\u0026n=PFlUzUBlM0j5aYl9\u0026q=85\u0026s=5e5f9ec2895cbe4026bf7e1729132ac0 2500w`})}),_jsx(Frame,{caption:`Booking days and times.`,children:_jsx(OptimizedImage,{src:`https://mintcdn.com/telimatic/PFlUzUBlM0j5aYl9/images/Screenshot-2026-10-01-212907.png?fit=max\u0026auto=format\u0026n=PFlUzUBlM0j5aYl9\u0026q=85\u0026s=d2fda464852ccdabbb31e10be01ff543`,alt:`Screenshot 2026 10 01 212907`,\"data-og-width\":`666`,width:`666`,\"data-og-height\":`529`,height:`529`,\"data-path\":`images/Screenshot-2026-10-01-212907.png`,\"data-optimize\":`true`,\"data-opv\":`3`,srcset:`https://mintcdn.com/telimatic/PFlUzUBlM0j5aYl9/images/Screenshot-2026-10-01-212907.png?w=280\u0026fit=max\u0026auto=format\u0026n=PFlUzUBlM0j5aYl9\u0026q=85\u0026s=577630f673e2ca848b15968678087675 280w, https://mintcdn.com/telimatic/PFlUzUBlM0j5aYl9/images/Screenshot-2026-10-01-212907.png?w=560\u0026fit=max\u0026auto=format\u0026n=PFlUzUBlM0j5aYl9\u0026q=85\u0026s=27520edfe01f116770316a523327eab4 560w, https://mintcdn.com/telimatic/PFlUzUBlM0j5aYl9/images/Screenshot-2026-10-01-212907.png?w=840\u0026fit=max\u0026auto=format\u0026n=PFlUzUBlM0j5aYl9\u0026q=85\u0026s=95a1f3d491e45752a9028d2ef04d7b60 840w, https://mintcdn.com/telimatic/PFlUzUBlM0j5aYl9/images/Screenshot-2026-10-01-212907.png?w=1100\u0026fit=max\u0026auto=format\u0026n=PFlUzUBlM0j5aYl9\u0026q=85\u0026s=ceccb66a347d3f8556b7dcf0956fceda 1100w, https://mintcdn.com/telimatic/PFlUzUBlM0j5aYl9/images/Screenshot-2026-10-01-212907.png?w=1650\u0026fit=max\u0026auto=format\u0026n=PFlUzUBlM0j5aYl9\u0026q=85\u0026s=6e3f78f38d46d60aac27cdfd77002aa3 1650w, https://mintcdn.com/telimatic/PFlUzUBlM0j5aYl9/images/Screenshot-2026-10-01-212907.png?w=2500\u0026fit=max\u0026auto=format\u0026n=PFlUzUBlM0j5aYl9\u0026q=85\u0026s=78306de040d1cc71c561a28ee445c5bd 2500w`})})]}),_jsxs(Step,{title:`Set the failover destination`,children:[_jsxs(_components.p,{children:[`Set the failover destination. This is where calls go if the agent is offline. It can be an extension or a phone number. Click `,_jsx(_components.strong,{children:`Finish`}),`.`]}),_jsx(Frame,{caption:`Failover destination, then Finish.`,children:_jsx(OptimizedImage,{src:`https://mintcdn.com/telimatic/PFlUzUBlM0j5aYl9/images/Screenshot-2026-10-01-212928.png?fit=max\u0026auto=format\u0026n=PFlUzUBlM0j5aYl9\u0026q=85\u0026s=2321073966dd3c71606b527a663bca44`,alt:`Screenshot 2026 10 01 212928`,\"data-og-width\":`711`,width:`711`,\"data-og-height\":`553`,height:`553`,\"data-path\":`images/Screenshot-2026-10-01-212928.png`,\"data-optimize\":`true`,\"data-opv\":`3`,srcset:`https://mintcdn.com/telimatic/PFlUzUBlM0j5aYl9/images/Screenshot-2026-10-01-212928.png?w=280\u0026fit=max\u0026auto=format\u0026n=PFlUzUBlM0j5aYl9\u0026q=85\u0026s=b528a079837963f5bf931d5db8becdf1 280w, https://mintcdn.com/telimatic/PFlUzUBlM0j5aYl9/images/Screenshot-2026-10-01-212928.png?w=560\u0026fit=max\u0026auto=format\u0026n=PFlUzUBlM0j5aYl9\u0026q=85\u0026s=eef747bb4aaa4844261df2dd12e525b0 560w, https://mintcdn.com/telimatic/PFlUzUBlM0j5aYl9/images/Screenshot-2026-10-01-212928.png?w=840\u0026fit=max\u0026auto=format\u0026n=PFlUzUBlM0j5aYl9\u0026q=85\u0026s=b843a1aac0fe3a3b836feba5a2ecf4bb 840w, https://mintcdn.com/telimatic/PFlUzUBlM0j5aYl9/images/Screenshot-2026-10-01-212928.png?w=1100\u0026fit=max\u0026auto=format\u0026n=PFlUzUBlM0j5aYl9\u0026q=85\u0026s=f21088c6f121205f9f84fb65f7d47c36 1100w, https://mintcdn.com/telimatic/PFlUzUBlM0j5aYl9/images/Screenshot-2026-10-01-212928.png?w=1650\u0026fit=max\u0026auto=format\u0026n=PFlUzUBlM0j5aYl9\u0026q=85\u0026s=77bf8166bf0b7a4911105988c6942bd0 1650w, https://mintcdn.com/telimatic/PFlUzUBlM0j5aYl9/images/Screenshot-2026-10-01-212928.png?w=2500\u0026fit=max\u0026auto=format\u0026n=PFlUzUBlM0j5aYl9\u0026q=85\u0026s=0cbe981fc44b0d7e784181c0b444adb2 2500w`})})]}),_jsx(Step,{title:`Done`,children:_jsx(_components.p,{children:`Your agent is now set up and live.`})})]}),`\n`,_jsx(Heading,{level:`2`,id:`personalize-the-agent-optional`,children:`Personalize the agent (optional)`}),`\n`,_jsx(_components.p,{children:`For more tailored responses, give the agent your own instructions and settings.`}),`\n`,_jsxs(Steps,{children:[_jsx(Step,{title:`Open your agents`,children:_jsxs(_components.p,{children:[`Click the `,_jsx(_components.strong,{children:`AI Agents`}),` tile in your NetSapiens base. The agent you just set up appears on the page.`]})}),_jsxs(Step,{title:`Click the edit icon`,children:[_jsx(_components.p,{children:`Hover over the agent, then hover over the pencil icon. This is the edit button, and it starts the personalization flow.`}),_jsx(Frame,{caption:`The edit (pencil) icon on an existing agent.`,children:_jsx(OptimizedImage,{src:`https://mintcdn.com/telimatic/PFlUzUBlM0j5aYl9/images/Screenshot-2026-10-01-213000.png?fit=max\u0026auto=format\u0026n=PFlUzUBlM0j5aYl9\u0026q=85\u0026s=016e0044b9bf84d5d61ad0891b621f67`,alt:`Screenshot 2026 10 01 213000`,\"data-og-width\":`1528`,width:`1528`,\"data-og-height\":`423`,height:`423`,\"data-path\":`images/Screenshot-2026-10-01-213000.png`,\"data-optimize\":`true`,\"data-opv\":`3`,srcset:`https://mintcdn.com/telimatic/PFlUzUBlM0j5aYl9/images/Screenshot-2026-10-01-213000.png?w=280\u0026fit=max\u0026auto=format\u0026n=PFlUzUBlM0j5aYl9\u0026q=85\u0026s=43a00ec9bc71ae886587b6d154db36f8 280w, https://mintcdn.com/telimatic/PFlUzUBlM0j5aYl9/images/Screenshot-2026-10-01-213000.png?w=560\u0026fit=max\u0026auto=format\u0026n=PFlUzUBlM0j5aYl9\u0026q=85\u0026s=acc2d733290853a8dad4990cea9f6c14 560w, https://mintcdn.com/telimatic/PFlUzUBlM0j5aYl9/images/Screenshot-2026-10-01-213000.png?w=840\u0026fit=max\u0026auto=format\u0026n=PFlUzUBlM0j5aYl9\u0026q=85\u0026s=3c53a7834be0b1d0df54e42914912509 840w, https://mintcdn.com/telimatic/PFlUzUBlM0j5aYl9/images/Screenshot-2026-10-01-213000.png?w=1100\u0026fit=max\u0026auto=format\u0026n=PFlUzUBlM0j5aYl9\u0026q=85\u0026s=74891d561a96ddfece4387fad8231d0b 1100w, https://mintcdn.com/telimatic/PFlUzUBlM0j5aYl9/images/Screenshot-2026-10-01-213000.png?w=1650\u0026fit=max\u0026auto=format\u0026n=PFlUzUBlM0j5aYl9\u0026q=85\u0026s=a656bf887edff4beaf027a79036101fb 1650w, https://mintcdn.com/telimatic/PFlUzUBlM0j5aYl9/images/Screenshot-2026-10-01-213000.png?w=2500\u0026fit=max\u0026auto=format\u0026n=PFlUzUBlM0j5aYl9\u0026q=85\u0026s=6a60f027c4c142750a624bf3bd118262 2500w`})})]}),_jsxs(Step,{title:`Adjust the settings`,children:[_jsx(_components.p,{children:`This opens the detailed settings, where you can personalize the agent.`}),_jsx(Frame,{caption:`Settings tabs.`,children:_jsx(OptimizedImage,{src:`https://mintcdn.com/telimatic/PFlUzUBlM0j5aYl9/images/Screenshot-2026-10-01-213030.png?fit=max\u0026auto=format\u0026n=PFlUzUBlM0j5aYl9\u0026q=85\u0026s=0b7a9eeb37ed84a2806403d83014427e`,alt:`Screenshot 2026 10 01 213030`,\"data-og-width\":`1363`,width:`1363`,\"data-og-height\":`178`,height:`178`,\"data-path\":`images/Screenshot-2026-10-01-213030.png`,\"data-optimize\":`true`,\"data-opv\":`3`,srcset:`https://mintcdn.com/telimatic/PFlUzUBlM0j5aYl9/images/Screenshot-2026-10-01-213030.png?w=280\u0026fit=max\u0026auto=format\u0026n=PFlUzUBlM0j5aYl9\u0026q=85\u0026s=3045c71a03b3f4ac37244150f47020a8 280w, https://mintcdn.com/telimatic/PFlUzUBlM0j5aYl9/images/Screenshot-2026-10-01-213030.png?w=560\u0026fit=max\u0026auto=format\u0026n=PFlUzUBlM0j5aYl9\u0026q=85\u0026s=1feef0489e756380b099ae0302a91cd1 560w, https://mintcdn.com/telimatic/PFlUzUBlM0j5aYl9/images/Screenshot-2026-10-01-213030.png?w=840\u0026fit=max\u0026auto=format\u0026n=PFlUzUBlM0j5aYl9\u0026q=85\u0026s=3e32701ec3fd8de9daa133a3a294812f 840w, https://mintcdn.com/telimatic/PFlUzUBlM0j5aYl9/images/Screenshot-2026-10-01-213030.png?w=1100\u0026fit=max\u0026auto=format\u0026n=PFlUzUBlM0j5aYl9\u0026q=85\u0026s=293df16d3c19cc46a2776a9a3e876e3b 1100w, https://mintcdn.com/telimatic/PFlUzUBlM0j5aYl9/images/Screenshot-2026-10-01-213030.png?w=1650\u0026fit=max\u0026auto=format\u0026n=PFlUzUBlM0j5aYl9\u0026q=85\u0026s=fe66178f2c1804594525a58c40d3b40d 1650w, https://mintcdn.com/telimatic/PFlUzUBlM0j5aYl9/images/Screenshot-2026-10-01-213030.png?w=2500\u0026fit=max\u0026auto=format\u0026n=PFlUzUBlM0j5aYl9\u0026q=85\u0026s=3a3504756cafeabf671a13fc0a48d544 2500w`})}),_jsx(Frame,{caption:`Agent instructions and transfer rules.`,children:_jsx(OptimizedImage,{src:`https://mintcdn.com/telimatic/PFlUzUBlM0j5aYl9/images/Screenshot-2026-10-01-213101.png?fit=max\u0026auto=format\u0026n=PFlUzUBlM0j5aYl9\u0026q=85\u0026s=dfaff4f39c685f46e3413452a6b405bc`,alt:`Screenshot 2026 10 01 213101`,\"data-og-width\":`927`,width:`927`,\"data-og-height\":`621`,height:`621`,\"data-path\":`images/Screenshot-2026-10-01-213101.png`,\"data-optimize\":`true`,\"data-opv\":`3`,srcset:`https://mintcdn.com/telimatic/PFlUzUBlM0j5aYl9/images/Screenshot-2026-10-01-213101.png?w=280\u0026fit=max\u0026auto=format\u0026n=PFlUzUBlM0j5aYl9\u0026q=85\u0026s=ce375cbcd8a4e9d173f51af0f13ed1f7 280w, https://mintcdn.com/telimatic/PFlUzUBlM0j5aYl9/images/Screenshot-2026-10-01-213101.png?w=560\u0026fit=max\u0026auto=format\u0026n=PFlUzUBlM0j5aYl9\u0026q=85\u0026s=689077dc5a9f1b450bc56ee459ff98f7 560w, https://mintcdn.com/telimatic/PFlUzUBlM0j5aYl9/images/Screenshot-2026-10-01-213101.png?w=840\u0026fit=max\u0026auto=format\u0026n=PFlUzUBlM0j5aYl9\u0026q=85\u0026s=9160fe556479a2174bc592fcecb3cf38 840w, https://mintcdn.com/telimatic/PFlUzUBlM0j5aYl9/images/Screenshot-2026-10-01-213101.png?w=1100\u0026fit=max\u0026auto=format\u0026n=PFlUzUBlM0j5aYl9\u0026q=85\u0026s=5b7485a098e13e532a293eca400a8a4b 1100w, https://mintcdn.com/telimatic/PFlUzUBlM0j5aYl9/images/Screenshot-2026-10-01-213101.png?w=1650\u0026fit=max\u0026auto=format\u0026n=PFlUzUBlM0j5aYl9\u0026q=85\u0026s=a5bebc0313992c9addaf533403bda468 1650w, https://mintcdn.com/telimatic/PFlUzUBlM0j5aYl9/images/Screenshot-2026-10-01-213101.png?w=2500\u0026fit=max\u0026auto=format\u0026n=PFlUzUBlM0j5aYl9\u0026q=85\u0026s=e406653e2ad109d676ea4f49e87e9638 2500w`})}),_jsx(Frame,{caption:`Greetings, notification emails, voice, language, and other settings.`,children:_jsx(OptimizedImage,{src:`https://mintcdn.com/telimatic/PFlUzUBlM0j5aYl9/images/Screenshot-2026-10-01-213130.png?fit=max\u0026auto=format\u0026n=PFlUzUBlM0j5aYl9\u0026q=85\u0026s=1e9082a0bf3a55887e4e4acb26d8db36`,alt:`Screenshot 2026 10 01 213130`,\"data-og-width\":`670`,width:`670`,\"data-og-height\":`741`,height:`741`,\"data-path\":`images/Screenshot-2026-10-01-213130.png`,\"data-optimize\":`true`,\"data-opv\":`3`,srcset:`https://mintcdn.com/telimatic/PFlUzUBlM0j5aYl9/images/Screenshot-2026-10-01-213130.png?w=280\u0026fit=max\u0026auto=format\u0026n=PFlUzUBlM0j5aYl9\u0026q=85\u0026s=6024fcaa0b5a015998e92862f03c4d52 280w, https://mintcdn.com/telimatic/PFlUzUBlM0j5aYl9/images/Screenshot-2026-10-01-213130.png?w=560\u0026fit=max\u0026auto=format\u0026n=PFlUzUBlM0j5aYl9\u0026q=85\u0026s=d08f9c7e7721b5776a600caf703969fe 560w, https://mintcdn.com/telimatic/PFlUzUBlM0j5aYl9/images/Screenshot-2026-10-01-213130.png?w=840\u0026fit=max\u0026auto=format\u0026n=PFlUzUBlM0j5aYl9\u0026q=85\u0026s=ac1fbacd5956bce28bfded63dd9c2fb0 840w, https://mintcdn.com/telimatic/PFlUzUBlM0j5aYl9/images/Screenshot-2026-10-01-213130.png?w=1100\u0026fit=max\u0026auto=format\u0026n=PFlUzUBlM0j5aYl9\u0026q=85\u0026s=d0f97caab50cd30542e56508354a2fa5 1100w, https://mintcdn.com/telimatic/PFlUzUBlM0j5aYl9/images/Screenshot-2026-10-01-213130.png?w=1650\u0026fit=max\u0026auto=format\u0026n=PFlUzUBlM0j5aYl9\u0026q=85\u0026s=f69eca3c09b84187c61a09449592dc97 1650w, https://mintcdn.com/telimatic/PFlUzUBlM0j5aYl9/images/Screenshot-2026-10-01-213130.png?w=2500\u0026fit=max\u0026auto=format\u0026n=PFlUzUBlM0j5aYl9\u0026q=85\u0026s=df9e8a98c119f97da98d16e5b893bbfc 2500w`})})]})]}),`\n`,_jsx(Heading,{level:`2`,id:`add-a-knowledge-base-optional`,children:`Add a knowledge base (optional)`}),`\n`,_jsx(_components.p,{children:`For full business context, give the agent documents to work from. It refers to them in every conversation.`}),`\n`,_jsx(Steps,{children:_jsxs(Step,{title:`Upload your documents`,children:[_jsxs(_components.p,{children:[`On the AI Agents page, open the `,_jsx(_components.strong,{children:`Knowledge Base`}),` tab and upload the documents you want the agent to use.`]}),_jsx(Frame,{caption:`Knowledge Bases inside the AI Agents page.`,children:_jsx(OptimizedImage,{src:`https://mintcdn.com/telimatic/PFlUzUBlM0j5aYl9/images/Screenshot-2026-10-01-213156.png?fit=max\u0026auto=format\u0026n=PFlUzUBlM0j5aYl9\u0026q=85\u0026s=b707316ad25a4518e2c10c8f049592fd`,alt:`Screenshot 2026 10 01 213156`,\"data-og-width\":`1009`,width:`1009`,\"data-og-height\":`382`,height:`382`,\"data-path\":`images/Screenshot-2026-10-01-213156.png`,\"data-optimize\":`true`,\"data-opv\":`3`,srcset:`https://mintcdn.com/telimatic/PFlUzUBlM0j5aYl9/images/Screenshot-2026-10-01-213156.png?w=280\u0026fit=max\u0026auto=format\u0026n=PFlUzUBlM0j5aYl9\u0026q=85\u0026s=fd506faad18ad95850098654a27ff79a 280w, https://mintcdn.com/telimatic/PFlUzUBlM0j5aYl9/images/Screenshot-2026-10-01-213156.png?w=560\u0026fit=max\u0026auto=format\u0026n=PFlUzUBlM0j5aYl9\u0026q=85\u0026s=5d3d6e2b1386433f56c253b9dcbc8b87 560w, https://mintcdn.com/telimatic/PFlUzUBlM0j5aYl9/images/Screenshot-2026-10-01-213156.png?w=840\u0026fit=max\u0026auto=format\u0026n=PFlUzUBlM0j5aYl9\u0026q=85\u0026s=8e397a0f3cbb269860f5a5da70ca68bc 840w, https://mintcdn.com/telimatic/PFlUzUBlM0j5aYl9/images/Screenshot-2026-10-01-213156.png?w=1100\u0026fit=max\u0026auto=format\u0026n=PFlUzUBlM0j5aYl9\u0026q=85\u0026s=cc0ae34da5dbd359b0e8f2f77fa611ac 1100w, https://mintcdn.com/telimatic/PFlUzUBlM0j5aYl9/images/Screenshot-2026-10-01-213156.png?w=1650\u0026fit=max\u0026auto=format\u0026n=PFlUzUBlM0j5aYl9\u0026q=85\u0026s=f2ec07218c9992cd7f8d1131a5c27609 1650w, https://mintcdn.com/telimatic/PFlUzUBlM0j5aYl9/images/Screenshot-2026-10-01-213156.png?w=2500\u0026fit=max\u0026auto=format\u0026n=PFlUzUBlM0j5aYl9\u0026q=85\u0026s=d953d0e76fae37c331c2ac016681486d 2500w`})})]})})]})}function MDXContent(props={}){const{wrapper:MDXLayout}={..._provideComponents(),...props.components};return MDXLayout?_jsx(MDXLayout,{...props,children:_jsx(_createMdxContent,{...props})}):_createMdxContent(props)}return{default:MDXContent};function _missingMdxReference(id,component){throw new Error(`Expected `+(component?`component`:`object`)+\" `\"+id+\"` to be defined: you likely forgot to import, pass, or provide it.\")}","frontmatter":{},"scope":{"config":{},"pageMetadata":{"title":"Set Up Your First AI Agent on NetSapiens","sidebarTitle":"Set Up Your First AI Agent on NetSapiens","description":"Create and configure your first Telzino AI agent from the AI Agents tile in your NetSapiens domain","href":"/setup-guides/netsapiens-first-agent"}}},"mdxSourceWithNoJs":null},"mdxExtracts":{"tableOfContents":[{"title":"Personalize the agent (optional)","slug":"personalize-the-agent-optional","depth":2,"children":[]},{"title":"Add a knowledge base (optional)","slug":"add-a-knowledge-base-optional","depth":2,"children":[]}],"codeExamples":{}},"jsLinks":["/_mintlify/custom/telimatic/792bea19b1ef8860/updateMintlifyDocs.js"],"subdomain":"telimatic","siteName":"AI Phone Agent Docs","title":"Docs - AI phone agents for SMB","navMaps":{"firstHrefInVersion":{},"firstHrefInLanguage":{}},"lastModified":"2026-10-24T00:29:23.316Z","originalFileLocation":"setup-guides/netsapiens-first-agent.mdx"},"headHtml":"\u003cscript data-mint-head>(function(){var d=document.documentElement,p=\"light\";if(!p){try{p=localStorage.getItem(\"isDarkMode\")}catch(e){}if(p==='true')p='dark';else if(p==='false')p='light';if(p!=='light'\u0026\u0026p!=='dark'\u0026\u0026p!=='system')p=\"light\"}var r=p==='system'?(matchMedia(\"(prefers-color-scheme: dark)\").matches?'dark':'light'):p;d.classList.remove(r==='dark'?'light':'dark');d.classList.add(r);d.setAttribute(\"data-theme-preference\",p)})();\u003c/script>\u003cmeta data-mint-head name=\"description\" content=\"Create and configure your first Telzino AI agent from the AI Agents tile in your NetSapiens domain\">\u003cmeta data-mint-head name=\"application-name\" content=\"AI Phone Agent Docs\">\u003cmeta data-mint-head name=\"generator\" content=\"Mintlify\">\u003clink data-mint-head rel=\"icon\" type=\"image/png\" sizes=\"192x192\" href=\"/mintlify-assets/_mintlify/favicons/telimatic/NnaTq6owhepGnYbT/_generated/favicon/android-chrome-192x192.png\" media=\"(prefers-color-scheme: light)\">\u003clink data-mint-head rel=\"apple-touch-icon\" type=\"image/png\" sizes=\"180x180\" href=\"/mintlify-assets/_mintlify/favicons/telimatic/NnaTq6owhepGnYbT/_generated/favicon/apple-touch-icon.png\">\u003clink data-mint-head rel=\"icon\" type=\"image/png\" sizes=\"16x16\" href=\"/mintlify-assets/_mintlify/favicons/telimatic/NnaTq6owhepGnYbT/_generated/favicon/favicon-16x16.png\" media=\"(prefers-color-scheme: light)\">\u003clink data-mint-head rel=\"icon\" type=\"image/png\" sizes=\"32x32\" href=\"/mintlify-assets/_mintlify/favicons/telimatic/NnaTq6owhepGnYbT/_generated/favicon/favicon-32x32.png\" media=\"(prefers-color-scheme: light)\">\u003clink data-mint-head rel=\"shortcut icon\" type=\"image/x-icon\" href=\"/mintlify-assets/_mintlify/favicons/telimatic/NnaTq6owhepGnYbT/_generated/favicon/favicon.ico\" media=\"(prefers-color-scheme: light)\">\u003clink data-mint-head rel=\"icon\" type=\"image/png\" sizes=\"192x192\" href=\"/mintlify-assets/_mintlify/favicons/telimatic/NnaTq6owhepGnYbT/_generated/favicon-dark/android-chrome-192x192.png\" media=\"(prefers-color-scheme: dark)\">\u003clink data-mint-head rel=\"icon\" type=\"image/png\" sizes=\"16x16\" href=\"/mintlify-assets/_mintlify/favicons/telimatic/NnaTq6owhepGnYbT/_generated/favicon-dark/favicon-16x16.png\" media=\"(prefers-color-scheme: dark)\">\u003clink data-mint-head rel=\"icon\" type=\"image/png\" sizes=\"32x32\" href=\"/mintlify-assets/_mintlify/favicons/telimatic/NnaTq6owhepGnYbT/_generated/favicon-dark/favicon-32x32.png\" media=\"(prefers-color-scheme: dark)\">\u003clink data-mint-head rel=\"shortcut icon\" type=\"image/x-icon\" href=\"/mintlify-assets/_mintlify/favicons/telimatic/NnaTq6owhepGnYbT/_generated/favicon-dark/favicon.ico\" media=\"(prefers-color-scheme: dark)\">\u003cmeta data-mint-head property=\"og:title\" content=\"Docs - AI phone agents for SMB\">\u003cmeta data-mint-head property=\"og:description\" content=\"The AI phone agent for small business. Answer calls and texts with an AI phone agent that always works and is never busy.\">\u003cmeta data-mint-head property=\"og:site_name\" content=\"Docs - AI phone agents for SMB\">\u003cmeta data-mint-head property=\"og:url\" content=\"https://docs.telzino.com/setup-guides/netsapiens-first-agent\">\u003cmeta data-mint-head property=\"og:type\" content=\"website\">\u003cmeta data-mint-head property=\"og:image\" content=\"https://telzino.com/images/openGraphImage-noBrand.png\">\u003cmeta data-mint-head property=\"og:image:width\" content=\"1200\">\u003cmeta data-mint-head property=\"og:image:height\" content=\"630\">\u003cmeta data-mint-head name=\"twitter:card\" content=\"summary_large_image\">\u003cmeta data-mint-head name=\"twitter:title\" content=\"Docs - AI phone agents for SMB\">\u003cmeta data-mint-head name=\"twitter:description\" content=\"The AI phone agent for small business. Answer calls and texts with an AI phone agent that always works and is never busy.\">\u003cmeta data-mint-head name=\"twitter:image\" content=\"https://telzino.com/images/openGraphImage-noBrand.png\">\u003cmeta data-mint-head name=\"twitter:image:width\" content=\"1200\">\u003cmeta data-mint-head name=\"twitter:image:height\" content=\"630\">\u003cmeta data-mint-head name=\"msapplication-config\" content=\"/mintlify-assets/_mintlify/favicons/telimatic/NnaTq6owhepGnYbT/_generated/favicon/browserconfig.xml\">\u003cmeta data-mint-head name=\"apple-mobile-web-app-title\" content=\"AI Phone Agent Docs\">\u003cmeta data-mint-head name=\"msapplication-TileColor\" content=\"#0075FF\">\u003clink data-mint-head rel=\"canonical\" href=\"https://docs.telzino.com/setup-guides/netsapiens-first-agent\">\u003clink data-mint-head rel=\"alternate\" type=\"application/xml\" href=\"/sitemap.xml\">\u003clink data-mint-head rel=\"alternate\" type=\"text/markdown\" href=\"/setup-guides/netsapiens-first-agent.md\">\u003cscript data-mint-head type=\"application/ld+json\">{\"@context\":\"https://schema.org\",\"@graph\":[{\"@type\":\"Organization\",\"@id\":\"https://docs.telzino.com/#organization\",\"name\":\"AI Phone Agent Docs\",\"url\":\"https://docs.telzino.com\",\"logo\":{\"@type\":\"ImageObject\",\"url\":\"https://mintcdn.com/telimatic/yiNgz-d0a-JfVRwO/logo/mainlogo.png?fit=max\u0026auto=format\u0026n=yiNgz-d0a-JfVRwO\u0026q=85\u0026s=a231ffe7491e72d2aa1f0b2e60ba2bfe\"}},{\"@type\":\"WebSite\",\"@id\":\"https://docs.telzino.com#website\",\"name\":\"AI Phone Agent Docs\",\"url\":\"https://docs.telzino.com\",\"publisher\":{\"@id\":\"https://docs.telzino.com/#organization\"}},{\"@type\":\"WebPage\",\"@id\":\"https://docs.telzino.com/setup-guides/netsapiens-first-agent#webpage\",\"url\":\"https://docs.telzino.com/setup-guides/netsapiens-first-agent\",\"name\":\"Set Up Your First AI Agent on NetSapiens\",\"description\":\"Create and configure your first Telzino AI agent from the AI Agents tile in your NetSapiens domain\",\"dateModified\":\"2026-10-24T00:29:23.316Z\",\"isPartOf\":{\"@id\":\"https://docs.telzino.com#website\"},\"breadcrumb\":{\"@id\":\"https://docs.telzino.com/setup-guides/netsapiens-first-agent#breadcrumb\"}},{\"@type\":\"BreadcrumbList\",\"@id\":\"https://docs.telzino.com/setup-guides/netsapiens-first-agent#breadcrumb\",\"itemListElement\":[{\"@type\":\"ListItem\",\"position\":1,\"name\":\"Setup Guides\",\"item\":\"https://docs.telzino.com/setup-guides/start-here\"},{\"@type\":\"ListItem\",\"position\":2,\"name\":\"NetSapiens\",\"item\":\"https://docs.telzino.com/setup-guides/connect-netsapiens-base\"},{\"@type\":\"ListItem\",\"position\":3,\"name\":\"Set Up Your First AI Agent on NetSapiens\",\"item\":\"https://docs.telzino.com/setup-guides/netsapiens-first-agent\"}]},{\"@type\":[\"Article\",\"TechArticle\"],\"@id\":\"https://docs.telzino.com/setup-guides/netsapiens-first-agent#article\",\"headline\":\"Set Up Your First AI Agent on NetSapiens\",\"name\":\"Set Up Your First AI Agent on NetSapiens\",\"description\":\"Create and configure your first Telzino AI agent from the AI Agents tile in your NetSapiens domain\",\"url\":\"https://docs.telzino.com/setup-guides/netsapiens-first-agent\",\"mainEntityOfPage\":{\"@id\":\"https://docs.telzino.com/setup-guides/netsapiens-first-agent#webpage\"},\"image\":\"https://telzino.com/images/openGraphImage-noBrand.png\",\"dateModified\":\"2026-10-24T00:29:23.316Z\",\"publisher\":{\"@id\":\"https://docs.telzino.com/#organization\"},\"isPartOf\":{\"@id\":\"https://docs.telzino.com#website\"}}]}\u003c/script>\u003cscript data-mint-head type=\"application/ld+json\">{\"@context\":\"https://schema.org\",\"@type\":\"WebSite\",\"name\":\"AI Phone Agent Docs\",\"publisher\":{\"@type\":\"Organization\",\"name\":\"AI Phone Agent Docs\"},\"provider\":{\"@type\":\"Organization\",\"name\":\"Mintlify\",\"url\":\"https://mintlify.com\"}}\u003c/script>","agentPointerHref":"/setup-guides/netsapiens-first-agent.md","siteName":"AI Phone Agent Docs","nav":{"global":null,"tabs":[{"tab":"Documentation","groups":[{"group":"Setup Guides","pages":[{"title":"Start Here","href":"/setup-guides/start-here"},{"group":"Any SIP PBX","pages":[{"title":"Prepare Your Telzino Account (Any SIP PBX)","href":"/setup-guides/prepare-account"},{"title":"Set Up Your First AI Agent on Any SIP PBX","sidebarTitle":"Set up your first agent","href":"/setup-guides/general-pbx"},{"title":"SIP Registration","href":"/setup-guides/sip-registration"}]},{"group":"NetSapiens","pages":[{"title":"Claim NetSapiens Base to Telzino","description":"Claim your NetSapiens base and add your domain so the AI Agents module appears in your NetSapiens portal","href":"/setup-guides/connect-netsapiens-base"},{"title":"Set Up Your First AI Agent on NetSapiens","sidebarTitle":"Set Up Your First AI Agent on NetSapiens","href":"/setup-guides/netsapiens-first-agent"},{"title":"NetSapiens CSP Configuration","description":"Allowlist the Telzino Connect App in the NetSapiens v44+ Portal Content Security Policy","href":"/setup-guides/netsapiens-csp"}]},{"title":"Context in SIP Headers","href":"/setup-guides/inject-context"}]},{"group":"Managing AI agents","pages":[{"title":"Managing AI Agents","href":"/admin-guide/overview"}]},{"group":"Telzino Dashboard","pages":[{"title":"Overview","href":"/admin-guide/dashboard/overview"},{"title":"Accessing the Dashboard","href":"/admin-guide/dashboard/accessing"},{"title":"Customer Management","href":"/admin-guide/dashboard/customer-management"},{"title":"Reports","href":"/admin-guide/dashboard/reports"},{"title":"Billing","href":"/admin-guide/dashboard/billing"},{"title":"Agent Billing: Live, Demo, Off","href":"/admin-guide/dashboard/agent-billing"},{"title":"Agent configuration","href":"/admin-guide/dashboard/agent-configuration"},{"title":"Account Settings","href":"/admin-guide/dashboard/account-settings"},{"title":"Custom Domains","href":"/admin-guide/dashboard/custom-domains"},{"title":"Feature Administration","href":"/admin-guide/dashboard/feature-administration"},{"title":"Screenshare","href":"/admin-guide/dashboard/screenshare"},{"title":"Support","href":"/admin-guide/dashboard/support"},{"title":"Support Tickets","href":"/admin-guide/dashboard/support-tickets"}]},{"group":"Connect App","pages":[{"title":"Connect App Overview","href":"/admin-guide/connect/overview"},{"title":"Agents List","href":"/admin-guide/connect/agents-list"},{"title":"Edit an Agent","href":"/admin-guide/connect/edit-agent"},{"title":"Agent Inbox","href":"/admin-guide/connect/inbox"},{"title":"Logs","href":"/admin-guide/connect/logs"},{"title":"Usage","href":"/admin-guide/connect/usage"},{"title":"Knowledgebase","href":"/admin-guide/connect/knowledgebase"},{"title":"Templates","href":"/admin-guide/connect/templates"},{"title":"Guardrails","href":"/admin-guide/connect/guardrails"},{"title":"Suppression List","href":"/admin-guide/connect/suppression-list"},{"title":"Twilio SMS","href":"/admin-guide/connect/twilio-sms"},{"title":"Voice Preview","href":"/admin-guide/connect/voice-preview"}]},{"group":"Agent Settings","pages":[{"title":"Instructions","href":"/agents/instructions"},{"title":"Greeting","href":"/agents/greeting"},{"title":"Language","href":"/agents/language"},{"title":"Voice","href":"/agents/voice"},{"title":"Links","href":"/agents/links"}]},{"group":"Agent Functions","pages":[{"group":"Calls \u0026 transfers","pages":[{"title":"Call Transfer","href":"/functions/call-transfer"},{"title":"Warm Transfer","href":"/functions/warm-transfer"},{"title":"Transferred-Call Context","href":"/functions/transferred-call-context"},{"title":"IVR Menu Navigation","href":"/functions/ivr-navigation"}]},{"group":"Outbound calling","pages":[{"title":"Outbound Calls","href":"/functions/outbound-calls"},{"title":"Answering Machine Detection","href":"/functions/answering-machine-detection"},{"title":"Retry Policies","href":"/functions/retry-policies"},{"title":"Outbound Compliance","href":"/functions/outbound-compliance"},{"title":"Outbound Best Practices","href":"/functions/outbound-best-practices"}]},{"group":"Messaging","pages":[{"title":"Send SMS","href":"/functions/send-sms"},{"title":"SMS Templates","href":"/functions/sms-templates"},{"title":"Send Email","href":"/functions/send-email"},{"title":"Notify","href":"/functions/notify"},{"title":"Slack Notification","href":"/functions/slack-notification"},{"title":"Enhanced Email Capture","href":"/functions/email-capture"}]},{"group":"Scheduling \u0026 bookings","pages":[{"title":"Schedule","href":"/functions/schedule"},{"title":"OpenTable Reservations","href":"/functions/opentable-reservations"}]},{"group":"Payments","pages":[{"title":"Card Payments (Stripe)","href":"/functions/card-payments"}]},{"group":"Knowledge \u0026 lookups","pages":[{"title":"Knowledge Base (RAG)","href":"/functions/knowledge-base"},{"title":"Google Business","href":"/functions/google-business"},{"title":"Listings Search","href":"/functions/listings-search"},{"title":"Webhooks","href":"/functions/webhooks"}]},{"group":"Specialized agents","pages":[{"title":"Translator Agent","href":"/functions/translator-agent"},{"title":"Notetaker Agent","href":"/functions/notetaker-agent"},{"title":"Survey Agent","href":"/functions/survey-agent"}]},{"group":"Call lifecycle","pages":[{"title":"Pre-Answer","href":"/functions/pre-answer"},{"title":"Audio Recording","href":"/functions/start-stop-recording"},{"title":"End of Call Action","href":"/functions/end-of-call-action"},{"title":"Reporting","href":"/functions/reporting"}]}]},{"group":"NetSapiens Functions","pages":[{"title":"NetSapiens Functions","href":"/netsapiens-functions/overview"},{"title":"Get Timeframe","href":"/netsapiens-functions/get-timeframe"},{"title":"Verify User","href":"/netsapiens-functions/verify-user"},{"title":"Reset Password","href":"/netsapiens-functions/reset-password"},{"title":"Lookup Directory","href":"/netsapiens-functions/lookup-directory"},{"title":"Set Call Forwarding","href":"/netsapiens-functions/set-call-forwarding"},{"title":"Send SMS","href":"/netsapiens-functions/send-sms"},{"title":"Check SMS Replies","href":"/netsapiens-functions/check-sms-replies"},{"title":"Chat Notification","href":"/netsapiens-functions/chat-notification"}]},{"group":"Event Webhooks","pages":[{"title":"Event Webhooks","href":"/event-webhooks/overview"},{"title":"Payloads","href":"/event-webhooks/payloads"},{"title":"Events","href":"/event-webhooks/events"},{"title":"Verifying requests","href":"/event-webhooks/verifying"},{"title":"Delivery, retries and health","href":"/event-webhooks/delivery"},{"title":"Testing and replay","href":"/event-webhooks/testing-and-replay"}]},{"group":"Agent Examples","pages":[{"title":"Take a Message","href":"/examples/message-taker"},{"title":"Restaurant","href":"/examples/restaurants"},{"title":"Retail","href":"/examples/retail"},{"title":"Home Services","href":"/examples/home-services"},{"title":"Professional Services","href":"/examples/professional-services"},{"title":"Salon","href":"/examples/salon"},{"title":"Logistics","href":"/examples/logistics"},{"title":"Best Practices","href":"/examples/best-practices"},{"title":"Appointment Confirmation","href":"/examples/appointment-confirmation"},{"title":"Receptionist Agent Using Google Sheets as Simple CRM","sidebarTitle":"Google Sheets CRM Receptionist","href":"/examples/google-sheets-crm-receptionist"}]},{"group":"Integrations","pages":[{"title":"Integrations","href":"/integrations/overview"},{"title":"Google Calendar","href":"/integrations/google-calendar"},{"title":"Outlook Calendar","href":"/integrations/outlook-calendar"},{"title":"ModMed","href":"/integrations/modmed"},{"title":"Sage 100","href":"/integrations/sage100"},{"title":"Twilio","href":"/integrations/twilio"},{"title":"Web Embed","href":"/integrations/web-embed"},{"title":"Embedding Tools for AI Enablement","href":"/enablement/embed"},{"title":"Model Context Protocol (MCP)","href":"/integrations/mcp"},{"title":"SendGrid SMTP","href":"/integrations/sendgrid"}]},{"group":"SDK","pages":[{"title":"Voice SDK Quickstart","href":"/sdk/quickstart"},{"title":"SDK Authentication","href":"/sdk/authentication"},{"title":"Core API","href":"/sdk/core-api"},{"title":"React","href":"/sdk/react"},{"title":"Chat","href":"/sdk/chat"},{"title":"Server SDK","href":"/sdk/server"},{"title":"Events and errors","href":"/sdk/events"},{"title":"Security","href":"/sdk/security"}]},{"group":"White Label","pages":[{"title":"White-Label Capabilities","href":"/enablement/whitelabel"}]},{"group":"Configure agents with AI","pages":[{"title":"Configure AI Agents with an AI Assistant","sidebarTitle":"Overview","href":"/configure-with-ai/overview"},{"title":"Runbook for AI Assistants","sidebarTitle":"Runbook for AI assistants","href":"/configure-with-ai/runbook"},{"title":"Connecting AI Tools","sidebarTitle":"Connecting tools","href":"/configure-with-ai/connecting-tools"},{"title":"Example Prompts","sidebarTitle":"Example prompts","href":"/configure-with-ai/example-prompts"}]},{"group":"Developers","pages":[{"title":"Agent Runbook","href":"/agent-runbook"}]}]},{"tab":"API Reference","pages":[{"title":"API Reference","href":"/api-reference/overview"}]}]},"basePath":"","title":"Docs - AI phone agents for SMB","buildId":"dpl_715YoAgvjTGBDdo8RtXmHKM22b5p","deploymentId":"dpl_715YoAgvjTGBDdo8RtXmHKM22b5p","dynamics":["07c022d89b","a74be98ba7"],"chunks":["Frame-vIkpUzVS.js","DynamicMarkdown-TAXIW2vN.js","zoom-image-lightbox-y00V8U6G.js","lightbox-handle-r17bVUz3.js"]}